Subscribe For Free Updates!

We'll not spam mate! We promise.

Monday, November 18, 2013

Update Galaxy Note 3 LTE N9005 To Android 4.3 Manually

With the release of Note 3 Samsung claims to take the experience at the next level. We try to find out if its still the best phablet in the market.Samsung created a new category when it launched the Galaxy Note.
Samsung released an Android 4.3 Jelly Bean based update for Galaxy Note 3 LTE N9005, the update is delivered for certain countries in Europe like UK, France, Germany, Italy, Spain, Austria, Belgium and Hungary. The update firmware build is XXUDMJ7 armed with number of bug fixes to perfect the previous software version. 
However there is a manual solution too to install XXUDMJ7 Android 4.3 Jelly Bean, and I have compiled the steps on this post for you to follow. You don't need a rooted device since this is an official software however you will lose your root access for installing this, but don't worry you can root XXUDMJ7 back later. And CWM recovery is not required.

                           Galaxy Note 3 LTE N9005  


 REQUIREMENTS:

1. Backup your data.
2. XXUDMJ is for Galaxy Note 3 LTE N9005.
3. Have the original USB drivers of Note 3 installed on your computer.
4. Samsung KIES will detect your phone since this is an official update.
5. No need to firstly root your device.

 STEPS:

Step 1 - Download XXUDMJ Android 4.3 firmware Package to your computer, but don’t forget to extract it then store it to easy to find place like Desktop.

Step 2 - Download ODIN v3.07 to be used for installing XXUGMJ9 Android 4.3 on your Samsung Galaxy Note 3 LTE N9005 device.

Step 3- Shut down your device to enter the Download Mode, to do so please press these buttons simultaneously: Volume Down + Home, keep holding them and now press Power to display Android robot along with triangle (or a warning screen appears). To confirm entering Download Mode, press the Power button again.

Step 4 - Now launch ODIN from your PC, then plug your device to your PC while your device in the Download Mode.

Step 5 - If you managed to connect your computer to your device in the download mode, you will then see your ID:COM box become yellow followed with COM port number. This phase will take sometime thus just wait.

Step 6 - Within Odin do the following.

  • Click on ‘PDA’ then choose file with ‘CODE’ the name.
  • Click on ‘Phone’ then choose file with ‘MODEM’ in its name. If the file doesn't exist, ignore this step.
  • Click on ‘CSC’ then choose file with CSC’ in its name. If this file doesn't exist, ignore this step.
  • Click on ‘PIT’ then choose file with .pit file.However if this file doesn't exist, then ignore this one.
Step 7- Now you need to check Auto Reboot and F. Reset Time options from ODIN. Check this Re-Partition option, only if the .PIT file is selected in the step 6.

Step 8 - From ODIN, click the Start button for the installation to be started. This process will take sometime therefore just wait.

Step 9 - After the installation is finished, then you will see your device will reboot. When your device shows Home screen, then disconnect it from your PC.
                                          Now you are in 4.3

Update HTC One AT&T Variant with Android 4.3 Jelly Bean

How to Update HTC One AT&T Variant with Android 4.3 Jelly Bean 


Android 4.3 CyanogenMod 10.2 For HTC One 

Good news for the owners of the HTC One AT&T variant that they can get the latest Android 4.3 Jelly Bean by manually installing the Cyanogen Mod or CM 10.2 custom firmware on their handset. It is a customized and aftermarket firmware build based on the Android Open Source Project designed to enhance the performance of the official Android ROM released by vendors and network carriers.

NOTE :-Warning: Cyanogen Mod 10.2 is a custom and unofficial firmware for the HTC One AT&T variant. Manually upgrading your smart phone may cause damage on your device and we are not responsible for any damages which may occur. Read, follow and understand the instructions to prevent damaging the HTC One. Do this at your own risk.

Requirements:
  • Install USB drivers necessary for HTC One AT&T variant on your computer.
  • Enable the USB debugging mode on your device.
  • Download the Android 4.3 CyanogenMod 10.2 custom firmware and the Google Apps package to your computer.
  • Make sure that the battery level at least 50 per cent.   
 
Instructions:


1. Connect the HTC One AT&T variant to your computer using a USB cable.

2. Copy and paste all downloaded zip files to the SD card of your HTC One AT&T smartphone without extracting any of them.

3. Disconnect the device from your computer and then switch it off.

4. Reboot into Bootloader or Fastboot mode by pressing volume down and power keys at the same time.

5. Connect your HTC One AT&T variant to the computer.

6. Go to the "android-sdk-windows-platform-tools" directory on your computer then launch a Command Window.

7. Enter the following commands:
fastboot flash boot boot.img

8. Then enter the next commands:
fastboot reboot

9. After that, follow the instructions on the phone's screen and select "bootloader" then "recovery."

10. Do a full wipe inside the recovery mode. Select "wipe data/factory reset" and "wipe cache partition." Then go to "advanced > wipe Dalvik cache."

11. Go back to the main menu of the recovery mode and install the CM 10.2. Select "install zip from SD card > choose zip from SD card." Search for the CM10.2 Android 4.3 zip file you have copied earlier and confirm its installation. Apply the same with the Google Apps package.

12. Once the installation has been completed, go back to the main menu and select "reboot system now."

13. The HTC One AT&T smartphone may take up to 5 minutes before reaching the home screen on its first time running the new ROM.

That's all! Your HTC One AT&T variant is now running Android 4.3 Jelly Bean OS with customisable options and enhanced system of Cyanogen Mod 10.2 firmware.


Thursday, November 7, 2013

Update Micromax A116 Canvas HD To Official Jelly bean 4.2

How to install Official Jelly bean 4.2 on Micromax A116 Canvas HD 


Canvas series is the most famous series of Micromax and canvas HD is one of them.Now it is coming with the taste of latest android version 4.2.Micromax has rolled out the official Jelly Bean 4.2 update for the Canvas HD  handset. The update adds OTA features and users will also be able to move / install apps on external storage.
Some users had sent email to Micromax about the release and they replied back saying that there is no update for A116. I think it will take some time for Micromax to move the update to the service centres and probably many of the Micromax staff and service centres are not aware of it.

 NOTE:- Before you proceed do it at your own risk. This process may damage the handset and will void the warranty. So, proceed at your own risk. 

Things Needed
  1. Sptools [Download Link]
  2. Firmware file [Download Link]
  3. Mobistel Cynus T1 drivers [Download Link].
How to update Micromax A116 to Jelly Bean 4.2


  • Download and unzip the file S9201_4.2_MP_F3F8_B1_IN_MMX_09_FLASHER_USER.rar, so you get the files in S9201_4.2_MP_F3F8_B1_IN_MMX_09_FLASHER_USER folder.
  • Download SP_Flash_Tool_v3.1304.0.119.rar and unzip it so you have the files in SP_Flash_Tool_v3.1304.0.119 folder.
  • Switch off the A116 phone and remove the battery, SIMs and SD card. Then put the battery back but do not switch on the phone.
  • Run Flash tool exe from the SP_Flash_Tool_v3.1304.0.119 folder and select the scatter loading option and point to the scatter file found in 
  • S9201_4.2_MP_F3F8_B1_IN_MMX_09_FLASHER_USER folder.
 
                          Canvas HD OS upgrade guide 
 
  • Then hit the download button and connect the phone that is still in the switched off state.
  • You will see some activity (%) wait unit it reaches 100%. Then close the OK box and disconnect the phone. ( In case there is no activity either the drivers are not properly installed or you can try disconnecting the phone, remove battery and insert it again (do not start the phone), just connect and see if that works).
  • Now switch on the phone it will take some time for the first run and follow the process.
  • Once you get the home screen switch off the phone and then put in the SIM and SD card, switch it on back and you will be running the 4.2 on A116.                       
After the update
  • Phone storage = 0.91 GB free.
  • You can move apps / install apps to external storage. Nova 3 game works.
  • 598MB free RAM of 1GB.
  • Quadrant score = 4055
  • Nenamark =  37fps. 2nd time it was 46.1 fps.
  • Antutu = 13202.
  • New app Micromax game Hub and Software update (OTA) powered by Micromax.
  • Color reproduction not much of an improvement.


Monday, November 4, 2013

Update Samsung Galaxy S2 To Android 4.2.2

How to Update Samsung S2 to Android 4.2.2 Jelly Bean OS

As Samsung doesn't specifically mention the Galaxy S2 as a device that will receive Android 4.2 Jelly bean, but the response can be taken as the only piece of official acknowledgement from Samsung that the Galaxy S2 hasn't been forgotten to update this device.
The Samsung Galaxy S2 was originally slated to receive Android 4.2.2 Jelly Bean until insiders and carriers both confirmed Samsung was dropping the project around halfway through 2013. The reason why is still unclear, although whispers indicate that it could have had to do with problems porting over new Touch Wiz features to the older phone. Whatever the case, once Samsung announced in September that it would be scrapping Android 4.2.2 for phones like the Galaxy S3 and Galaxy Note 2 and instead focusing on Android 4.3 for those devices.


Things you Required:

-          Flash this custom ROM to the Samsung Galaxy S2 GT-I9100 only.
-          Create a backup of all personal information, settings and data files on your device.
-         Do not use the Samsung Kies to create backup files for your Galaxy S2.
-          Make sure that the battery life is at least 50 per cent.
-          Root the device and install a Clockwork Mod custom recovery.
-          Enable USB debugging mode on the device. Go to "Settings > Application > Development 
            >  USB debugging."
-          Download the Paranoid Android 4.2.2 Jelly Bean firmware and the Google Apps package to   
            your computer.
                             

Flashing Instructions:

1. Connect the Samsung Galaxy S2 GT-I9100 to your computer using a USB cable.

2. Copy both the Paranoid Android custom firmware and the Google Apps package you have downloaded earlier and paste them to the SD card of your phone. Do not extract any of the zip files.

3. Disconnect the Galaxy S2 and turn it off.

4. Reboot into recovery mode by pressing and holding the Volume up, Home and Power keys at the same time till you see the Samsung logo.

5. Inside the recovery mode, create a Nandroid backup of the current ROM. Select "backup and restore > backup." The ROM is saved to the SD card which you can restore anytime.

6. Now perform a full wipe on the device. Select "wipe data/factory reset" and "wipe cache partition" then go to "advanced > wipe Dalvik cache."

7. Install the Paranoid Android custom ROM by selecting "install zip from SD card > choose zip from SD card > choose the firmware you have copied earlier > confirm installation." Apple the same with the Google Apps package.

8. Once the installation has been completed, go back to the main menu then select "reboot system now."

9. Your Galaxy S2 will reboot and may take up to five minutes to load the home screen.

Congratulations! Paranoid Android custom ROM is now running your device with Android 4.2.2 Jelly Bean OS featuring all the original goodies and extra from the custom firmware.


Friday, November 1, 2013

Root Anroid with SuperOneClick

Android is the world's most popular operating system developed by google, mobile devices using the Android more and more popular and makes up 80% of the market. Root your phone and the Android device is one of the problems many Christians Android most search interest. Today i would like to introduce to you a method root your Android phone with the process very simple and easy.


What is Root Android?

Root phone is interpreted literally interventions directly into the computer system to gain full control or super user by which we can do custom changes to the root file of the operating system. Root needs to be done if you want to really master your equipment such as customizing optimize the function of the machine, Overclocking (increasing chip clock, GPU, etc.)

Remember before rooting

 Since Root is the direct intervention of the system, so any mistake can brick your smartphone. So       you need to make a careful process the Factory Recovery mode of the machine.

The Root your phone will also lose the warranty from the manufacturer due to arbitrarily interfere with the system. However with SuperOneClick root you can make Unroot process to return the machine to its original state and can provide warranty as normal, so you should remember to back up your data and applications to be able to serve back when needed.

Before performing the Root put the question to yourself if you really need to root the device? If the answer is yes then please follow the following steps:


    Steps to root:
             
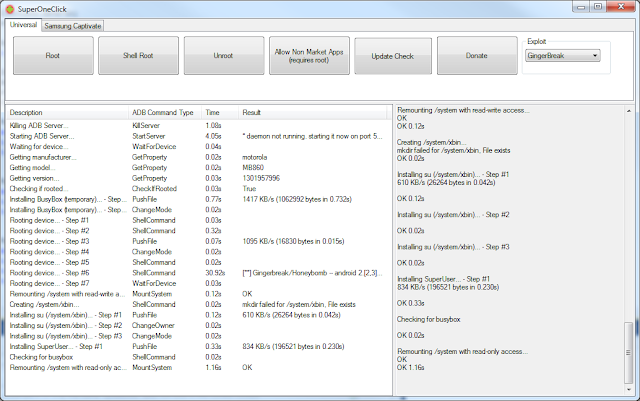
                      Root Android smartphone using SuperOneClick
 

  1. Download the latest version of SuperOneClick 2.33 here, save it on your computer.
  2. Connect your phone to your computer via the USB port and turn on the "USB debugging mode". The same time un-mount the SD card.
  3. Now install the software SuperOneClick just downloaded. If you own a Samsung device select Samsung Captivate tab. Other devices selected Universal tab.
  4. Click Root and waiting, the process can take a few minutes to tens of minutes depending on the device. Ignore the warning and click OK in the activity log.
  5. After the root process is complete reboot the device and congratulations as Super User of the Android phone.


NFS Most Wanted 2013 full Data+APK free download

Need for Speed​​ Most Wanted is the famous racing rpg game in gaming world it make more with the release of this famous game for android platform, players will be entering the race riots in the streets chasing game with the police and many more.

NFS ​​Most Wanted is the best racing game of all time (as Asphalt 8 Android) for android. Need For Speed ​​Most Wanted Android Version is designed with 3D graphics, as well as the system tracks the vehicle's strong point game. Need For Speed ​Apk on Android ​is street fight, where only the most handlebars new silk can win. Besides, Need For Speed ​​is also equipped with a system of vehicle upgrade, help the suspense more races.

Graphic and vivid details of NFS ​​Most Wanted bring the player feel like you are sitting on the supercar working at breakneck speed to go with the things around as houses, trees also soaring through the eye. Sounds of Need for Speed​​ Most Wanted Apk is a combination of realistic simulation of the sound, the sound of brakes and the sound of rock music.

 
                      Download NFS Most Wanted Android 2013 for free  


                     Download NFS Most Wanted Android 2013 for free  
 
 
                     nfs most wanted free download for android   


 Install Instructions:
 
1.Download the game cache and .apk installation file.
2. Extract the archive with the game cache (by 7z or WinRAR) and copy extracted files to your phone to the folder which is specified in the game description.  paste the sd data cache fie in sd card/android/ data
3. Then run the installation file of the game (*.apk).
4. Wait for the installation is complete
for more better working first install the apk and then paste the sd data and run the game because it will not fetch the data some times.
most wanted game works  For Android 2.3.3 and higher. v.1.0.47
                              
                                           DOWNOAD FROM HERE


Asphalt 8 Airborne v1.0.0 Apk+Datafiles download


Asphalt is the best Android arcade racing game series which reaches a new turning point after the release of latest series with Asphalt Airbone .It contains better perform dynamic, high-speed aerial stunts in an intense driving experience powered by a brand-new engine  


 Asphalt Airborne New Features:


LUXURY DREAM CARS 
• 47 high-performance cars (80% of them NEW!)
• Top licensed manufacturers and models like Lamborghini Veneno, Bugatti Veyron, Ferrari FXX and Pagani Zonda R
• Newly recorded high-fidelity car motor sounds for realistic audio immersion.

GET AIRBORNE
• Hit the ramps and take the race above
• Perform barrel rolls and wild 360º jumps 
• Maneuver through the air, pulling stunts while racing

NEW EXOTIC LOCATIONS
• Race in 9 different settings like Venice, French Guiana, Iceland, the Nevada Desert and other exciting locations! 
• All tracks available in original and mirror variations in Career mode. 
• Discover plenty of hidden shortcuts

NEW FEATURES FOR SPEED FREAKS
• 8 seasons & 180 events in Career mode
• Stunning visuals thanks to next-gen shaders, real time geometry reflection & other amazing effects for a new simulation of speed!
• A detailed damage system like nothing you’ve seen before
• Check out the new Infected and Drift Gate game modes


Instructions: 
  1. Install APK
  2. Copy ‘com.gameloft.android.ANMP.GloftA8HM’ folder to ‘sdcard/Android/obb/’ (If you have installed v1.0.0 no need to download obb file)
  3. Launch the game (

Download : 21Mb APK : HERE
 
 *Do not use there Download manager Uncheck that option while Downloading 
 
OBB : SD DATA : PART1 PART2 PART3 PART4 PART5


GET AIRBORNE
• Hit the ramps and take the race above the track
• Perform barrel rolls and wild 360º jumps
• Maneuver through - See more at: http://allxfun.blogspot.in/2013/09/asphalt-8-airborne-v100-apkdatafiles.html#sthash.oGEManoE.dpuf
GET AIRBORNE
• Hit the ramps and take the race above the track
• Perform barrel rolls and wild 360º jumps
• Maneuver through - See more at: http://allxfun.blogspot.in/2013/09/asphalt-8-airborne-v100-apkdatafiles.html#sthash.oGEManoE.dpuf
GET AIRBORNE
• Hit the ramps and take the race above the track
• Perform barrel rolls and wild 360º jumps
• Maneuver through - See more at: http://allxfun.blogspot.in/2013/09/asphalt-8-airborne-v100-apkdatafiles.html#sthash.oGEManoE.dpuf
The best Android arcade racing game series reaches a new turning point! Perform dynamic, high-speed aerial stunts in an intense driving experience powered by a brand-new physics engine! - See more at: http://allxfun.blogspot.in/2013/09/asphalt-8-airborne-v100-apkdatafiles.html#sthash.oGEManoE.dpuf

Update Samsung Galaxy Note 2 To Android 4.3 Jelly Bean

Android 4.3 Jelly Bean Update: Test Firmware For Samsung Galaxy Note 2  (GT-N7100)  


Good news for the samsung note 2 users that the Samsung Galaxy Note 2 Android 4.3 Jelly Bean update has leaked and i bring this in front of you.Its release with owners of the GT-7100 variant of the Galaxy Note 2 now able to install a test version of the Android 4.3 update before its official arrival.

Samsung Galaxy Note 2 Android 4.3 Jelly Bean update confirmed and we’ve seen details about the update leak out. Samsung confirmed the upgrade numerous times recently and it also announced that it would be coming with a number of new enhancements to go along with the features on board Android 4.3 Jelly Bean.
Read more at http://www.gottabemobile.com/2013/10/28/samsung-galaxy-note-2-android-4-3-update-leaks/#BZyOyhC8vIKllbsu.99

The Android 4.3 firmware is currently under development but its released is confirmed and Samsung is expected to officially release the update to both the Galaxy S3 and Galaxy Note 2 soon.

Keep in mind that there may be various bugs and instabilities due to the fact that this is pre-release software. However, installing this will not increase your binary counter, so those worried about future warranty support shouldn’t worry too hard.

Things needed before proceed:

 -Make sure that you have proper backup for data.

- The Samsung Galaxy Note 2 should have at least 80 percent battery power.

- The USB drivers for the device must be installed on the computer. [Download here]

- Enable USB Debugging.

- After flashing the firmware, you will lose custom ROMs installed in your device.

- You will also lose custom recovery if you have any.

- After installing it on your Galaxy Note 2, you will lose the root if you have any as the    N7100XXUEMJ5 is an official firmware.

- The process is meant only for the Samsung Galaxy Note 2 (GT- N7100).

- The firmware will not increase your binary counter nor void your warranty.

NOTE: I will not be responsible for anything that goes wrong. Users should proceed at their own risk.


NOW LETS START:

Step 1: Download the updated firmware package and extract the zip file.  

Step 2: Download Odin v3.09 and extract the zip file.

Step 3: Switch off the phone and put it on the Download Mode. To do this, press Volume Down + Home + Power buttons and then press Volume Up when the warning message appears.

Step 4: Open Odin v3.09.exe as an Administrator.
Step 5: Connect the Galaxy Note 2 to your computer via the USB cable while in the Download mode, and wait until you get a blue sign in Odin.

Step 6: In Odin, click on PDA and select the .tar.md5 file that you have extracted from the Firmware Package in Step 1.

Step 7: In Odin, select the Auto Reboot and F. Reset Time options, but make sure that the re-partition check box is not selected.

Step 8: Click on the Start button in Odin to begin the installation process.

Step 9: Once the installation is complete, the device will reboot .
Once you get the Samsung logo on the home screen, unplug the device from the computer and close Odin.

Samsung Galaxy Note 2 Android 4.3 Jelly Bean update confirmed and we’ve seen details about the update leak out. Samsung confirmed the upgrade numerous times recently and it also announced that it would be coming with a number of new enhancements to go along with the features on board Android 4.3 Jelly Bean.
Read more at http://www.gottabemobile.com/2013/10/28/samsung-galaxy-note-2-android-4-3-update-leaks/#BZyOyhC8vIKllbsu.99


                        THAT's ALL NOW YOU GOT 4.3 IN YOUR NOTE 2

Android 4.3 Jelly Bean update release dates leak to the surface, indicating that updates were a lot closer than many owners may have thought. While those updates were for the AT&T, Sprint, T-Mobile and Verizon versions, U.S. Cellular became the first carrier in the United States to confirm these updates for arrival saying that they will be rolling out in the “coming weeks.”
Read more at http://www.gottabemobile.com/2013/10/28/galaxy-s4-galaxy-s3-galaxy-note-2-android-4-3-update-confirmed-us/#UbJXvKpfoygsBVUz.99